
6.09.2022
9.27.2012
This is Harder Than I Thought...
To keep up with blogging, that is.
I really have had the best of intentions to keep up to date on my blogs (yes, I have 2...and the scary thing is that this one is more up-to-date than the other one!!).
So, what keeps me so busy these days? Life!! The Diva is now in Kindergarten, and that keeps me hopping. She has been getting weekly homework assignments, as well as extra reading assignments. The assignments aren't difficult, just time consuming, and too much for her to do on her own. Her regular homework assignments have been posters that she needs to fill in answers and decorate. Simple enough. Then, because she is so advanced in reading, the reading specialist is now sending home extra books and projects for her to do. The objective is to keep her mind busy, and keeping school interesting and challenging for her. The projects are fun, but because they are geared towards older kids (she is at a 3-4th grade reading level), they require some crafting assistance from you know who.
On top of school "stuff", the Diva has started Ringette. Originally, the plan was for her to play initiation level/U6. Perfect...one practice a week, no actual games, and fun with other 5 & 6 year olds. WRONG!! After going to one of the "Come Try It" events, she was picked out by the League President to try playing on the U8 Bunny Team. That means, games and practices every weekend, as well as now playing with 7, 8 and 9 year olds!! Did I mention that she's 5?!?! I never imagined that we'd be Rink Parents this early on, but it looks like I know where we're spending our winter!!
As for crafting/baking/gardening, I've been busy. Despite being gone for 3 weeks of the growing season, we did get a decent crop of potatoes, beets and onions. Last weekend, I pulled out the last of my summer plants to prepare for winter. i miss the color already, so I'm sure I'll be going mum shopping before too long.
Recently we bought a new oven and I love it!!! It has one door, but can be separated into two cooking spaces. I've used that feature a few times and I love it. I'm also getting more used to convection baking.
As for crafting, I have been knitting a sweater for Hannah. She picked out some beautiful wool (girl has good taste) this summer, and though it is taking me much longer than planned, she'll have a sweater before too long. I feel awful that I am not getting this one done in the two days it took me to make a similar one last year, but I have been having a lot of problems with my hands and I cannot knit as fast anymore. At a recent doctor's appointment, I was told that I tested positive on one of the rheumatoid arthritis factors and I'm not surprised at all. I'm getting re-tested in December, and considering that the Alberta winters do my joints no favors, I'll likely test even higher. So, I take my time with knitting, and figure that my projects will get done eventually.
So, that's what I've been up to. I'll do my best to post whenever I can, but please be patient with me.
Thanks for reading!
Cheers!
Sharon
8.28.2012
Spring Cleaning...in the Fall??
Hello All-
I have been pretty busy around here with all of my spring cleaning...wait, what? Spring cleaning in August?? Yup...you heard right. In the actual Spring season, I am up to my eyeballs in end of the year school stuff and planning my garden and Summer activities. In other words, I had no time for cleaning. This time of the year has always worked best for me, and now that Hannah is in school, I tack on cleaning out the drawers to the list, and my back to school shopping becomes much easier!!
This week I have been working hard in the bathrooms and laundry room, trying to de-funk the drains, faucets, you name it. The first thing I tackled was the Master Bathroom sink. Any house I have ever lived in has always had a slow drain in the Master Bath. I'm sure it has to do with the amount of use it gets, as well as my hair. In any case, I wanted to try a DIY natural solution before resorting to chemicals and plungers.
I found a remedy online that suggests pouring 1/2 cup of baking soda in your drain, followed by 1/2 cup of white vinegar. Let it sit for 5 minutes with a damp cloth over the top and then rinse it down with steaming water. I gave it a go, though it sat much longer, as I got chatting on the phone with my Mom. I did find that 1/2 cup was a bit too much for my little drain, though it worked like a charm! After I removed the cloth, I used it to clean the sink and shine up the faucet. The drain now flows like it was brand new and I never had to buy or use chemicals to do it!
My next big project was the washing machine. The people who owned this house before us did not take good care of their machine. Remember this post?? I knew the rubber gasket was nasty, but I had put off actually cleaning it until today. I read in several places that good old water and vinegar would clean it up, so that was my first plan of action. As you can see from the photos, it looks much better now, but there are still nasty spots that need to be dealt with. I scrubbed them as much as I could without ruining the gasket and that didn't seem to be enough, so I think I'm going to try bleach and water next. I'll be sure to post my results.
So that's part of what I've been up to. I know it doesn't involve pretty hand knits, quilts, or cooking, but hopefully it is helpful info. Stay tuned for some "cleaner" posts...I have lots of ideas...just need a few more hours in the day to get them all typed up.
Cheers!
Sharon
I have been pretty busy around here with all of my spring cleaning...wait, what? Spring cleaning in August?? Yup...you heard right. In the actual Spring season, I am up to my eyeballs in end of the year school stuff and planning my garden and Summer activities. In other words, I had no time for cleaning. This time of the year has always worked best for me, and now that Hannah is in school, I tack on cleaning out the drawers to the list, and my back to school shopping becomes much easier!!
This week I have been working hard in the bathrooms and laundry room, trying to de-funk the drains, faucets, you name it. The first thing I tackled was the Master Bathroom sink. Any house I have ever lived in has always had a slow drain in the Master Bath. I'm sure it has to do with the amount of use it gets, as well as my hair. In any case, I wanted to try a DIY natural solution before resorting to chemicals and plungers.
I found a remedy online that suggests pouring 1/2 cup of baking soda in your drain, followed by 1/2 cup of white vinegar. Let it sit for 5 minutes with a damp cloth over the top and then rinse it down with steaming water. I gave it a go, though it sat much longer, as I got chatting on the phone with my Mom. I did find that 1/2 cup was a bit too much for my little drain, though it worked like a charm! After I removed the cloth, I used it to clean the sink and shine up the faucet. The drain now flows like it was brand new and I never had to buy or use chemicals to do it!
My next big project was the washing machine. The people who owned this house before us did not take good care of their machine. Remember this post?? I knew the rubber gasket was nasty, but I had put off actually cleaning it until today. I read in several places that good old water and vinegar would clean it up, so that was my first plan of action. As you can see from the photos, it looks much better now, but there are still nasty spots that need to be dealt with. I scrubbed them as much as I could without ruining the gasket and that didn't seem to be enough, so I think I'm going to try bleach and water next. I'll be sure to post my results.
 |
| Before...I wanted to throw up!! |
 |
| After...still not great, but MUCH better!! |
So that's part of what I've been up to. I know it doesn't involve pretty hand knits, quilts, or cooking, but hopefully it is helpful info. Stay tuned for some "cleaner" posts...I have lots of ideas...just need a few more hours in the day to get them all typed up.
Cheers!
Sharon
8.24.2012
Delinquent...again
Hello All!
After taking what was only supposed to be a little time off, I think I'm actually prepared to jump back into the world of blogging. I had full tensions to post things all summer, but as usual, I got sidetracked and then we were out of the country for a few weeks on holidays. I'm back now, and with school starting back up soon, I might actually have some free time on my hands for blogging.
Stay tuned, as I have many posts written in my head that I just need to type up. Some topics you'll be seeing soon are: Crock-pot cooking (my oven has been dead for a it now, so I have become the Crock-pot Queen this summer), back to school crafts, some Halloween party ideas, and much more.
As for my own crafting, I haven't done too much. I did buy some fabric and yarn on vacation in New England, so hopefully that inspires me to get my butt in gear.
I hope you are all having a wonderful summer and thanks for following along on my crazy adventures!
Cheers!
Sharon
P.S. Hi Aunt T!! Thanks for the kick in the butt! Miss you already!
6.02.2012
Oh Me, Oh My...I've Been Busy!!
Hello All-
My apologies for the lack of posts lately. I have been so busy that at the end of the day, I just want to crash!! Along with a trip to Calgary, a cold that knocked me on my butt for a few days, and trying to get my garden going, I have been knitting up a storm!!
Rather than bore you with a long post, here are the photos...
First, in my blogging hiatus, I worked on 5 (yes 5!) WCOBBS blankets.
 |
| Tulip Time- I did the top white garter stitch stripe. |
 |
| Ocean Breeze- I did the navy and white stripe on the top. |
 |
| The Board Members all started blankets to see who could assemble a team to finish a blanket first...this was the beginning of my team's blanket. |
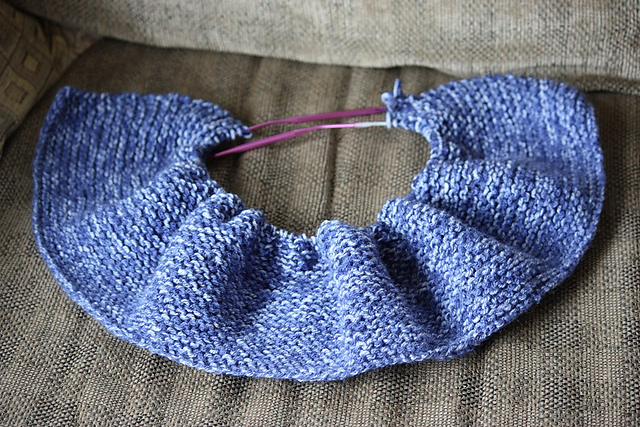 |
| I started a "Mystery Blanket" that will get named by the person who adds the final border. |
 |
| And finally, I started a blanket called The Garden. |
So there you have it...5 blankets in a short period of time. I don't usually abuse my hands so much, but you'll see that I only did garter stitch stripes, so it wasn't too bad on my joints. Most of my knitting took place while sitting in the car waiting for Hannah to get out of school.
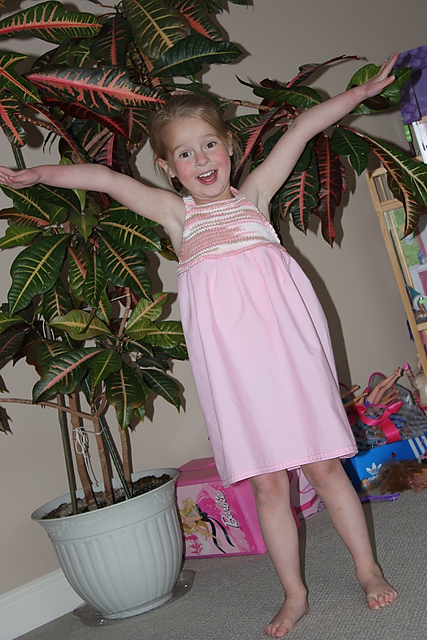 |
| As usual, my "ham" is doing what she does best for the camera!! |
Speaking of Hannah, she got some handmade goodies as well. I named this dress Summer Sundae, since the colors are that of chocolate, strawberry and vanilla ice cream. The top is knit with cotton, and the bottom is fabric. Sewing them together was a bit tricky, but not that hard.
The straps on this dress are fully adjustable, so I'm sure she'll get quite a bit of wear out of it.
 Finally, I made a summer hat for a friend's child who had an accident a few weeks back. he had his head operated on, so Sarah wanted something to cover his head until his hair grew back. So, here's my model doing her thing again with Desmond's Hat.
 I must say, she looks pretty cute in it, so another one may be on the needles before too long.
So, there you have it. Along with all of these projects, I have a scarf on the needles and yarn bought for a few larger sweater projects. I'm also plugging away at Hannah's quilt and a few other sewing projects.
Stay tuned and I'll be posting a preview of this year's garden.
Cheers!
Sharon
4.25.2012
Update on Hannah's Quilt
Hello All-
 Well, if you have been reading my posts lately, you'll know that Hannah's quilt had to go on the back burner for a bit. Well, now that my special blankets are done, I'm back to getting squares sewn up for Hannah's quilt.
I'm doing a disappearing nine-patch pattern. I was planning on making a twin sized quilt, but Hannah thinks that a crib sized one will be better for snuggling. I guess I shouldn't complain at less work, right??
 Sorry for the crappy photos. The one up above won't turn, no matter how many times I try, and I noticed that the one to the left is blurry. Argh!! Oh well, you get the point. The squares aren't exactly in their final spots, but I was curious to see how they would look together.
So, there you have it. I made three large squares while Hannah was at school today, so a few more days like that and I'll be done in no time!!

I'm doing a disappearing nine-patch pattern. I was planning on making a twin sized quilt, but Hannah thinks that a crib sized one will be better for snuggling. I guess I shouldn't complain at less work, right??
 Sorry for the crappy photos. The one up above won't turn, no matter how many times I try, and I noticed that the one to the left is blurry. Argh!! Oh well, you get the point. The squares aren't exactly in their final spots, but I was curious to see how they would look together.
 So, there you have it. I made three large squares while Hannah was at school today, so a few more days like that and I'll be done in no time!!
Stay tuned for more updates!!
Happy Sewing!!
Sharon
4.24.2012
Deja's Garden
Hello All-
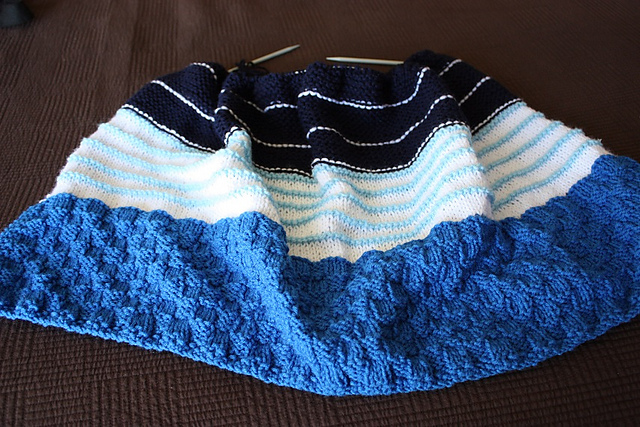
 I wanted to share with you a special blanket that I finished knitting the other night. I have named it Deja's Garden, and the pattern is "Chevron Baby Blanket" from The Purl Bee.
So, now the big questions...who is it for and where did the name come from?? Well, here's a go at...who is it for?
Recently, my Father-in-Law sent me an email that talked about two girls from the Dominican Republic who both have heart conditions. Through the generosity of the Rotary Club in Maine, the girls and their families are being flown up to Maine to have surgery done...by Hannah's old surgeon!! Dr. Quinn is doing the operations on both girls, aged 6 months and 11 years.
As soon as I heard what was going on, I knew I needed to make something to send. When Hannah had her surgeries, she was given the most beautiful hand knit blankets and quilts from complete strangers. These blankets are the reason why I knit for charity. I know how special they are and when you are going through the ordeal of having your child in the hospital, it is so comforting to know that you have the support of those around you...even those who you'll never meet.
When Hannah had her third operation, we had moved to Alberta and were living in Calgary. Her operation was done 3 hours away in Edmonton, where we ironically live now. During our 3 week hospital stay, we became friends with a very special family...Deja's family. We had never met them before, and they took us under their wing. Deja was another heart child, and she was in the ICU when Hannah was there. The family was from Edmonton, so they had lots of visitors coming in, and they always stopped to make sure that Hannah was well, and that we were ok...no matter what they were going through. Even after Hannah was moved out of the ICU, we stopped down to say hello regularly and after we left the hospital, my husband and I regretted not staying in touch with them. Even more, we regretted not ever getting the chance to actually meet Deja.
About a year later, Hannah had to go back to Stollery for a follow-up cath, and as we were getting ready to leave, I heard a familiar voice. It was Deja's Mom! Hannah and I were so thrilled to run into her, and it was such a blessing to see that in the stroller she was pushing was Deja! It was a short reunion, but one that I will never forget.
 Fast forward a few months, and I got a late-night phone call from Deja's Mom. She told me that Deja had earned her angel wings on Easter...about a week after we had run into them at the hospital. I cried for hours after we got off the phone, and I still tear up thinking about that call. I hated myself for not knowing and for not being there to support a family that had been so supportive to us.
Now, a year later, as I was pouring through patterns for a blanket idea, I decided to make one in honor of Deja. Her Mom posted a photo of her wearing a chevron patterned sweater. Deja's smile is the highlight of the photo, and I knew right away that this was the inspiration that I needed for my blanket! A quick approval from Hannah, and we were off to pick out colors.
So there you have it. In the heart community, you learn that everyone is somehow connected and how important it is to "pay it forward". I hope that this blanket brings much love and support to the family in Maine, just as it's inspiration did for my family.
Happy Crafting!
Sharon
P.S. The quilt I posted about previously is going to be given to the 11 year old girl. Both blankets are being mailed out this week to make it to Maine in time for the May surgeries.

So, now the big questions...who is it for and where did the name come from?? Well, here's a go at...who is it for?
Recently, my Father-in-Law sent me an email that talked about two girls from the Dominican Republic who both have heart conditions. Through the generosity of the Rotary Club in Maine, the girls and their families are being flown up to Maine to have surgery done...by Hannah's old surgeon!! Dr. Quinn is doing the operations on both girls, aged 6 months and 11 years.
As soon as I heard what was going on, I knew I needed to make something to send. When Hannah had her surgeries, she was given the most beautiful hand knit blankets and quilts from complete strangers. These blankets are the reason why I knit for charity. I know how special they are and when you are going through the ordeal of having your child in the hospital, it is so comforting to know that you have the support of those around you...even those who you'll never meet.
So, I started looking online for pattern ideas and soon came to a decision...which leads to question two. Where did the blanket name come from?
When Hannah had her third operation, we had moved to Alberta and were living in Calgary. Her operation was done 3 hours away in Edmonton, where we ironically live now. During our 3 week hospital stay, we became friends with a very special family...Deja's family. We had never met them before, and they took us under their wing. Deja was another heart child, and she was in the ICU when Hannah was there. The family was from Edmonton, so they had lots of visitors coming in, and they always stopped to make sure that Hannah was well, and that we were ok...no matter what they were going through. Even after Hannah was moved out of the ICU, we stopped down to say hello regularly and after we left the hospital, my husband and I regretted not staying in touch with them. Even more, we regretted not ever getting the chance to actually meet Deja.
About a year later, Hannah had to go back to Stollery for a follow-up cath, and as we were getting ready to leave, I heard a familiar voice. It was Deja's Mom! Hannah and I were so thrilled to run into her, and it was such a blessing to see that in the stroller she was pushing was Deja! It was a short reunion, but one that I will never forget.
 Fast forward a few months, and I got a late-night phone call from Deja's Mom. She told me that Deja had earned her angel wings on Easter...about a week after we had run into them at the hospital. I cried for hours after we got off the phone, and I still tear up thinking about that call. I hated myself for not knowing and for not being there to support a family that had been so supportive to us.
 Now, a year later, as I was pouring through patterns for a blanket idea, I decided to make one in honor of Deja. Her Mom posted a photo of her wearing a chevron patterned sweater. Deja's smile is the highlight of the photo, and I knew right away that this was the inspiration that I needed for my blanket! A quick approval from Hannah, and we were off to pick out colors.
So there you have it. In the heart community, you learn that everyone is somehow connected and how important it is to "pay it forward". I hope that this blanket brings much love and support to the family in Maine, just as it's inspiration did for my family.
Happy Crafting!
Sharon
P.S. The quilt I posted about previously is going to be given to the 11 year old girl. Both blankets are being mailed out this week to make it to Maine in time for the May surgeries.
Subscribe to:
Posts (Atom)