I have been getting some questions lately from friends looking for ornament ideas that would be good for their little ones to make. I did this post last year for "Kids in Cowtown" and I thought I would re-run it here.
Enjoy!!
I recently received my December issue of Canadian Living in the mail, and I couldn’t wait to try out one of the craft ideas, Salt Dough Snowflakes. I used salt dough for school projects as a child, so I was excited to use it again after all these years.
This project is great for doing with little ones. I had my 3 ½ year old help with every step, and she did a great job! I must also say that I had originally thought I was in for a big mess, but it wasn’t bad after all.

First, you need the following ingredients (Tip: I cut the ingredients in half for my first try and it worked fine):
2 cups all-purpose flour
1 cup salt
1 cup warm water
Mix the flour and salt together in a bowl with a wooden spoon. Add the water a bit at a time until your mix starts to look like cookie dough. Turn out onto your work surface, knead it a few times and roll it out to approx ¼ inch thickness.

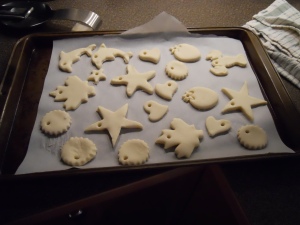
After that, use cookie cutters to make your shapes, and place them on a parchment lined cookie sheet. Before you put them in the oven, poke a hole in the top of each one with a drinking straw (this hole is for a hanging ribbon). Bake at 300-degrees for 1 to 1 ½ hours. Once they cool completely, you can paint and decorate them any way you like!
 Here are some tips I figured out along the way:
* You don’t have to use just snowflake cookie cutters…we used some that I already had in the house, and my daughter came up with the idea to use her Play Doh cutters. They worked great and made for some really fun shapes!

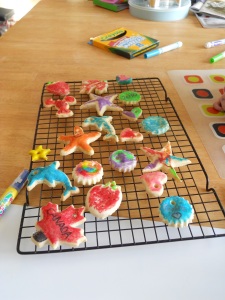
* I don’t have a lot of “kid-friendly” paints in my home, so we used washable markers. I found that they created less mess and Hannah was able to use more colors on each ornament. We also used glitter pens from one of her coloring sets to add some sparkle to each ornament.
 * We split this project into two days…one to make and bake the ornaments and another to color them. I found that not only did it give me two days of crafty fun, but my daughter’s attention span wasn’t stretched too far this way.
We had so much fun making these! While creating them, I thought of a few other uses for the ornaments…wouldn’t they make great place cards at a holiday meal? Guests could keep them as favours and remember a wonderful time at your home. (Be sure to add the year on the back of them with a permanent marker) Also, I can picture these as cool gift tags. With cookie cutters coming in so many different shapes, you could really personalize them to the gift recipient. Finally, do you have a lot of children that visit your home during the holidays? You could make the ornaments ahead of time, then make goodie bags with an ornament, a few markers, a glitter pen, and a piece of ribbon. Place everything into a clear bag with a gift tag, and you have a quick, easy gift that costs only a few dollars. The possibilities are endless!!!
 Have fun making your salty new works of art, and I would love to hear other uses that you can think of!
Cheers!
Sharon

4 comments:
AWESOME! How cute are those!
Hope it's ok with you, but I pinned it as a reminder to use with my girls this month.
Thanks for posting it :)
Pin away!!! Let me know how yours turn out!!!
Love it! Salt dough ornaments have been a tradition in our family for years as well. My mom actually used to make really fancy ones that she'd sell at holiday craft fairs. They are great fun for the whole family.
Hi Rachael!! Hmmm...maybe I should open up an Etsy shop!!!
Post a Comment