Showing posts with label toddler crafts. Show all posts

2.08.2012

Our Crafting has Gone to the Birds!

Hey Everyone!

Lately it seems like Hannah and I have been seeing more and more wildlife during our week.  Yesterday we saw 2 coyotes walking along the side of a city road (scary since they have to go through our neighborhood to get to the closest safe spot of them), and we've been seeing more and more birds flying overhead.  To celebrate the animals and to try to encourage our feathered friends to come visit our yard, we decided to make new bird feeders.  Our toilet paper tube feeders fed the magpies quite well, and we have been saving up more tubes for spring feeders.  In the meantime, we thought we'd try a different type of feeder. 

This idea originated from a Pinterest post of a project first posted on the HGTV website.  Click here for the link.  Hannah and my husband have been eating a lot of oranges lately, and he is a pro at keeping the peels whole, so I thought it would be perfect for us to try.

To make these feeders you need:

* Orange peels (try to keep them as hole free as possible.  One of ours had a hole from the bellybutton, so I used a snip of coffee filter to plug it)
* Bamboo skewer or chopstick (cut in half)
* Twine or string
* Hole puncher or nail

To make them, you take either your hole punch or nail and make small holes just a touch down from the edge of the orange.  You'll need to make at least two, directly across from each other.  I was a bit off, so I made four holes for better balance. 

Once your holes are made, slide your skewer/chopstick through the holes.  Despite having four holes, we only used one chopstick per feeder.  I wanted a bit of stability, as well as a perch for once the bird food gets lower. 

Then, simply tie the twine to the ends of the skewer, fill the feeder with your food of choice and hang in your favorite tree!!

You can fill these feeders with most anything.  We wanted to give the birds an extra treat, so we mixed up some peanut butter food for them.

To make the filling, you need:

* 1/2 cup peanut butter
* 1 cup of cornmeal or oats (we used a 1/2 cup of each)
* 1/4 cup raisins or any other dried fruit or nuts. 

Simply mix all of your ingredients in a bowl and fill your feeders.  For ours, we used raisins and dried apricots.  I found that the mixture was a bit too dry, so I added a touch more peanut butter to bind it all together.  You can adjust the amounts based on what looks right and what you have in your pantry.

We have two trees in the backyard, so we hung a feeder in each one.  Let's hope we see some customers real soon!!

This project is great for younger children.  They can help measure out the ingredients, mix everything together, fill the feeders and of course, eat the oranges!!

Cheers!
Sharon

12.09.2011

DIY Fun Foam Ornaments

Hello All!

Last night when we were putting up our family Christmas tree, I came across some ornaments that I thought I would share with all of you. 

When Hannah was little, we were concerned that her curiosity would result in some broken ornaments at Christmas.  So, I decided to make some 100% unbreakable ones. 

These are made out of fun foam, and take no time at all to make.  When I made these, sticky backed foam wasn't as available as it is now.  So, I used super glue and hot glue.  Now, you can get most any color or shape with a sticky back, making this project even easier!

First, you need to decide what shapes you will be making.  I used some cookie cutters as inspiration, but several of my ornaments were made free-hand.  I also based several ornaments on their breakable counterparts. 

Once you know what shapes you are doing, simply trace or draw out your shapes on the foam and cut them out.  Keep in mind the possibility that your shapes may end up reversed if you have any markings left from drawing them.  Also, be careful when you cut them out.  I was able to make two candy canes out of one cutting.  I simply made one in the reversed colors of the other.  Some other tools that can be helpful are hole punchers for berries and printable images on the computer. 


Finally, once all of your pieces are cut out, assemble them either with their sticky backs or glue.  When I use hot glue or super glue, I place all of my shapes on parchment paper.  It saves me from making a mess if the glue spills out the sides.
To hang your ornaments, you can use wire, ribbon, pipe cleaners, you name it.  I decided to use wire for mine.  I took a small piece of wire, doubled it over and twisted the ends together.  I then took a small scrap of coordinating foam and hot glued the pieces together, with the wire sandwiched in the middle.  On some of the ornaments, such as the blue ball with snow, I sandwiched the wire between the white and blue foam. Be sure if you do this that none of the wire is peeking out from under the foam.  It wouldn't take much to scratch a little one, which defeats the purpose of making kid friendly ornaments!! 

The possibilities are endless with this craft!  You could even pre-cut the pieces and have an ornament party with your kids and their friends.  These make great keepsakes, and you could even add a photo to a wreath shaped ornament for a great gift for family members.  I'd love to hear your ideas!!

Happy Crafting!!
Sharon

12.07.2011

DIY Recycled Bird Feeders

Hello All-

I was going through some photos left on my camera and I came across a project that I had been wanting to post and forgot.  About a month or so ago (before the snow), Hannah and I decided to do something nice for both the birds and the environment.  We made toilet paper tube bird feeders!!  This was a mildly messy project, but easy to clean and lots of fun!  Even though many of you may have snow, this can easily be adapted to being an indoor project...just be sure to cover the surface you're working on well to avoid a big mess.

First, we collected a few toilet paper tubes from our craft bag.  I had been saving them for a bit with no project in mind, so this was a perfect use for them!!

Next, you'll want to gather all of your supplies.  I suggest getting everything out first, since things can get a bit messy once the peanut butter comes out! 

For this project you'll need:
- Toilet paper tubes
- Bowl for peanut butter
- A child safe knife (or an adult can do the spreading)
- Birdseed
- A tray to catch extra birdseed

Once everything is ready, you'll want to put a fair amount of peanut butter in your bowl.  It doesn't take much to cover the tube, but little ones may have some trouble spreading it because of the stickiness, so you'll want to give them some extra. 

Then, spread the peanut butter all over the tube.  I found it best to put my fingers inside the tube to hold it and keep it's shape better while spreading.  The oils from the peanut butter tend to make the cardboard a touch soggy and it will crush much easier.  you might even want to hold the tube for your child while they cover it with peanut butter.

Next, roll the tube in birdseed.  I found that putting a bunch of seed into an old pie plate worked well.  It also made clean-up easier.

Once your tube is fully covered, find a tree branch to slide your tube over.  Be sure that you can easily see the branch from a window in your home, since snow may prevent you from getting outside to view.

Finally, admire your work and wait for a few new friends to stop by! 

The best thing about this project is that we had all of the materials in the house already, so it cost nothing.  It is also easy enough to make year round, so your feathered friends won't go hungry!!

Have fun making your toilet paper bird feeders!!

Happy Crafting!
Sharon

12.01.2011

Salt Dough Ornaments

Hello Everyone!!

I have been getting some questions lately from friends looking for ornament ideas that would be good for their little ones to make.  I did this post last year for "Kids in Cowtown" and I thought I would re-run it here.

Enjoy!!

I recently received my December issue of Canadian Living in the mail, and I couldn’t wait to try out one of the craft ideas, Salt Dough Snowflakes. I used salt dough for school projects as a child, so I was excited to use it again after all these years.
This project is great for doing with little ones. I had my 3 ½ year old help with every step, and she did a great job! I must also say that I had originally thought I was in for a big mess, but it wasn’t bad after all.


First, you need the following ingredients (Tip: I cut the ingredients in half for my first try and it worked fine):
2 cups all-purpose flour
1 cup salt
1 cup warm water
Mix the flour and salt together in a bowl with a wooden spoon. Add the water a bit at a time until your mix starts to look like cookie dough. Turn out onto your work surface, knead it a few times and roll it out to approx ¼ inch thickness.


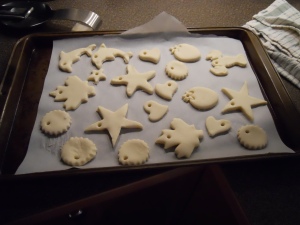
After that, use cookie cutters to make your shapes, and place them on a parchment lined cookie sheet. Before you put them in the oven, poke a hole in the top of each one with a drinking straw (this hole is for a hanging ribbon). Bake at 300-degrees for 1 to 1 ½ hours. Once they cool completely, you can paint and decorate them any way you like!


Here are some tips I figured out along the way:
* You don’t have to use just snowflake cookie cutters…we used some that I already had in the house, and my daughter came up with the idea to use her Play Doh cutters. They worked great and made for some really fun shapes!


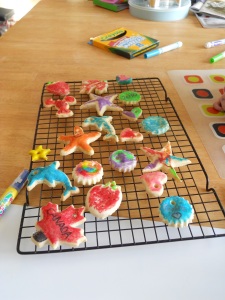
* I don’t have a lot of “kid-friendly” paints in my home, so we used washable markers. I found that they created less mess and Hannah was able to use more colors on each ornament. We also used glitter pens from one of her coloring sets to add some sparkle to each ornament.


* We split this project into two days…one to make and bake the ornaments and another to color them. I found that not only did it give me two days of crafty fun, but my daughter’s attention span wasn’t stretched too far this way.

We had so much fun making these! While creating them, I thought of a few other uses for the ornaments…wouldn’t they make great place cards at a holiday meal? Guests could keep them as favours and remember a wonderful time at your home. (Be sure to add the year on the back of them with a permanent marker) Also, I can picture these as cool gift tags. With cookie cutters coming in so many different shapes, you could really personalize them to the gift recipient. Finally, do you have a lot of children that visit your home during the holidays? You could make the ornaments ahead of time, then make goodie bags with an ornament, a few markers, a glitter pen, and a piece of ribbon. Place everything into a clear bag with a gift tag, and you have a quick, easy gift that costs only a few dollars. The possibilities are endless!!!

Have fun making your salty new works of art, and I would love to hear other uses that you can think of!

Cheers!
Sharon

3.30.2011

Crayons Crayons Everywhere!!

Hello All-

Do you have crayon pieces taking over your house?  If so, check out my post from yesterday's Kids in Cowtown blog...

Here's a preview...


While you're over at Kids in Cowtown, check out some of the other great posts!  Though they are written by folks in Calgary, many of the ideas can be applied in your own neck of the woods!!

Cheers!
Sharon

2.17.2010

Crafting with Toddlers...Valentine's Day Style

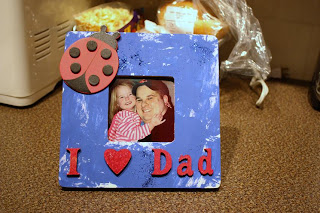
Crafting with toddlers is a skill. One that takes, in my opinion, LOTS of practice. The Diva and I recently made my hubby a Valentine’s Day gift. She and I went to Michaels, she picked out the frame, paint, wood shapes, everything. She was so proud of herself for being able to go shopping “like a big girl.”


So, we dug out her painting smock, and got to work. She painted the front of the frame. I offered to paint the back and sides and she said no. She liked them the way they were. Ummmm…okay. She “let” me paint the letters and glue everything, since the letters were so small and I had no intensions of letting her use my glue gun. After all, she is 2.

Hannah finished the whole project by selecting a photo to display. She originally picked one of the cats, but I told her that Daddy would much rather see her pretty face than our furry monsters. I must say, I am very proud of her crafting and the fact that she kept the whole thing a secret for a week or so!!!

While working on the frame with the Diva, I was reminded of some of the Rules of Toddler Crafting.

Rule #1: Put away your inner OCD crafter. It took a lot out of me to not paint the sides and back of the frame. I had to count to 10 and take some deep breaths (okay, not really, but it still irks me a bit)

Rule #2: Let go of the dollar signs. My little one was so excited to be making something all on her own for Daddy that I didn’t care what it cost. Granted, I wasn’t about to spend a small fortune on supplies, but I wasn’t counting pennies either. The same goes for supplies you already have at home. If you don’t want your toddler to use up all of the $15 glitter, don’t even show it to them. There is an unwritten rule in the heads of toddlers everywhere…they MUST use/dump/even eat all of the most expensive supplies you have! You’ve been warned!!!

Rule #3: You must act as the mediator. Unless you enjoy getting dirty looks from your significant other, don’t set them up for failure. As soon as the craft is seen, kindly say, “Honey, isn’t that the most beautiful (fill in the blank), you’ve ever seen?” This not only strokes the ego of your child, but it also tips off your significant other as to what the item is.

Rule #4: Let loose!! Who cares if you need to vacuum an extra time this week or if you need to throw your kid in the bath after a craft session? Being creative helps everyone involved grow and express themselves. Have fun and your child will too!!!


What are some of your favorite toddler crafts?? I’d love to hear about them!!

Cheers!
Sharon