As many of you know, I was writing for a site called Kids in Cowtown. For various reasons, the site closed down, but I wanted to repost some of my crafts, etc on here. I would hate to lose some great ideas before I was able to share them.
Cheers!
Sharon
June 9, 2011
Lately I have been seeing a lot of posts in the blogging world about making your own crayons, so Hannah and I thought it was time we gave it a try. I figured that with all of the bits and pieces we had accumulated in Hannah’s crayon box that it was time to put them to good use. A simple web search will give you lots of sites with detailed directions, but here are the basics of what we did.
 First, we dug through the crayon box and found all of the broken pieces. I also sacrificed the random crayons that came with coloring books and restaurant placemats. Once they have been separated out, start peeling the labels. This was honestly the longest part of the project! We quickly found that one of the major crayon makers has started gluing their labels to the crayons. Once you get the label off, a simple rub from your finger will get off any remaining residue. I found that the next step, breaking the crayons into smaller pieces, was the perfect stress reliever after peeling all of those silly labels!
 Now it is time to fill your molds. I had three that we wanted to try using: hearts, arrows and Sesame Street faces. I assumed that they were all oven-proof…not quite. They all held up, but the heart mold started to melt and the crayons were really hard to pop out of it. The other two molds were perfect for this project. (A side note, all three are ice cube trays…the arrows were bought at IKEA, the hearts were a wedding gift years ago and the Sesame Street faces were bought at our local dollar store) Simply fill each mold to the very top, either mixing colors or doing them solid. Be creative!
 I melted my crayons in a preheated oven set at 250-degrees F. I had read that it should only take 5-10 minutes, but I found that they took closer to 15 minutes. I suggest placing a foil lined tray on the oven shelf below in case any of them spill over.
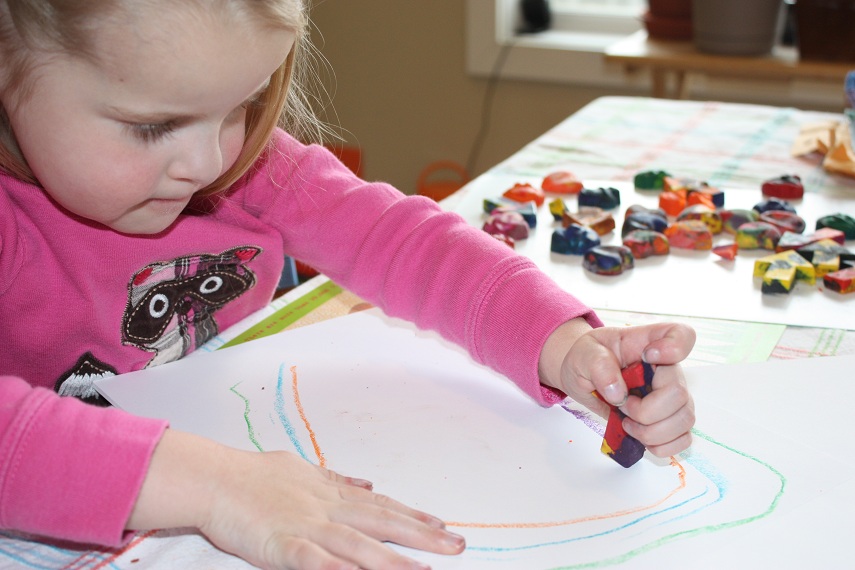
 Once they are melted, let the molds cool on a wire rack for 15 minutes or so. I then placed mine in the freezer to speed things up a bit. After another 15 minutes in the freezer, we simply popped them out onto parchment paper. You may need to run warm water over the bottom of the mold to help the crayons pop out. Once you are sure they are cooled completely, they are ready to use.
Happy Coloring!
 First, we dug through the crayon box and found all of the broken pieces. I also sacrificed the random crayons that came with coloring books and restaurant placemats. Once they have been separated out, start peeling the labels. This was honestly the longest part of the project! We quickly found that one of the major crayon makers has started gluing their labels to the crayons. Once you get the label off, a simple rub from your finger will get off any remaining residue. I found that the next step, breaking the crayons into smaller pieces, was the perfect stress reliever after peeling all of those silly labels!
 Now it is time to fill your molds. I had three that we wanted to try using: hearts, arrows and Sesame Street faces. I assumed that they were all oven-proof…not quite. They all held up, but the heart mold started to melt and the crayons were really hard to pop out of it. The other two molds were perfect for this project. (A side note, all three are ice cube trays…the arrows were bought at IKEA, the hearts were a wedding gift years ago and the Sesame Street faces were bought at our local dollar store) Simply fill each mold to the very top, either mixing colors or doing them solid. Be creative!
 I melted my crayons in a preheated oven set at 250-degrees F. I had read that it should only take 5-10 minutes, but I found that they took closer to 15 minutes. I suggest placing a foil lined tray on the oven shelf below in case any of them spill over.
 Once they are melted, let the molds cool on a wire rack for 15 minutes or so. I then placed mine in the freezer to speed things up a bit. After another 15 minutes in the freezer, we simply popped them out onto parchment paper. You may need to run warm water over the bottom of the mold to help the crayons pop out. Once you are sure they are cooled completely, they are ready to use.
Hannah and I had a blast doing this project. I can see us making more crayons to use as party favours or holiday gifts. I did find that there was some crayon residue left in each mold, so you will want to only use them for crayon making. This project only took an hour or so to do, and if you buy new molds will cost you less than $5.00 to make.