Showing posts with label Crafts. Show all posts

6.02.2012

Oh Me, Oh My...I've Been Busy!!

Hello All-

My apologies for the lack of posts lately.  I have been so busy that at the end of the day, I just want to crash!!  Along with a trip to Calgary, a cold that knocked me on my butt for a few days, and trying to get my garden going, I have been knitting up a storm!!

Rather than bore you with a long post, here are the photos...

First, in my blogging hiatus, I worked on 5 (yes 5!) WCOBBS blankets.


Tulip Time- I did the top white garter stitch stripe.


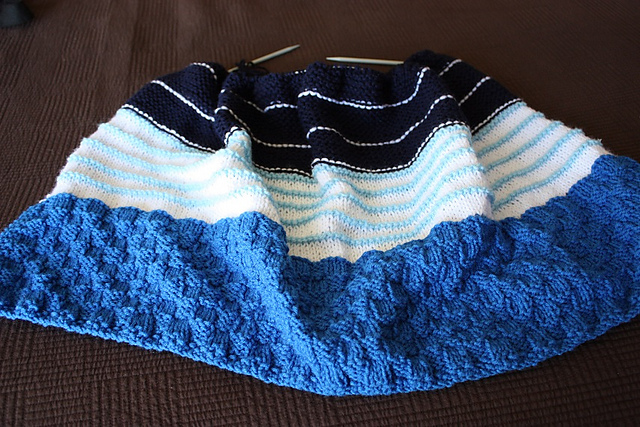
Ocean Breeze- I did the navy and white stripe on the top.

 
The Board Members all started blankets to see who could assemble a team to finish a blanket first...this was the beginning of my team's blanket.

 
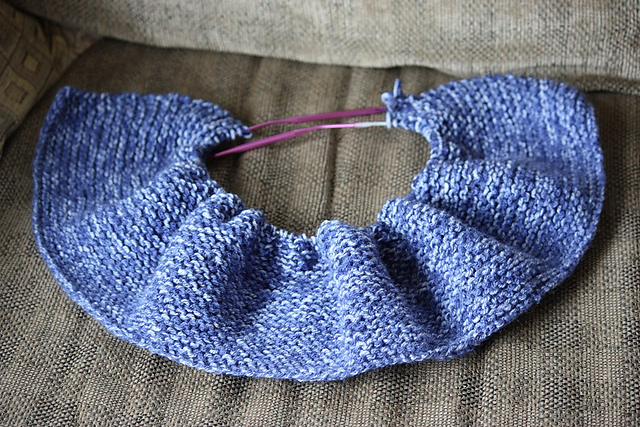
I started a "Mystery Blanket" that will get named by the person who adds the final border. 

And finally, I started a blanket called The Garden.

So there you have it...5 blankets in a short period of time.  I don't usually abuse my hands so much, but you'll see that I only did garter stitch stripes, so it wasn't too bad on my joints.  Most of my knitting took place while sitting in the car waiting for Hannah to get out of school.
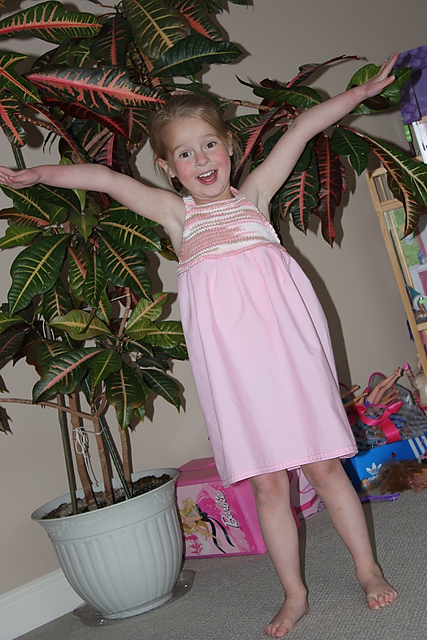
As usual, my "ham" is doing what she does best for the camera!!


Speaking of Hannah, she got some handmade goodies as well.  I named this dress Summer Sundae, since the colors are that of chocolate, strawberry and vanilla ice cream.  The top is knit with cotton, and the bottom is fabric.  Sewing them together was a bit tricky, but not that hard. 

The straps on this dress are fully adjustable, so I'm sure she'll get quite a bit of wear out of it.
Finally, I made a summer hat for a friend's child who had an accident a few weeks back.  he had his head operated on, so Sarah wanted something to cover his head until his hair grew back.  So, here's my model doing her thing again with Desmond's Hat. 

I must say, she looks pretty cute in it, so another one may be on the needles before too long.

So, there you have it.  Along with all of these projects, I have a scarf on the needles and yarn bought for a few larger sweater projects.  I'm also plugging away at Hannah's quilt and a few other sewing projects.

Stay tuned and I'll be posting a preview of this year's garden.

Cheers!
Sharon

4.17.2012

Paperdoll Suitcase

Hello All-

Hannah and I were cleaning out some of her old toys the other day, and we came across the magnetic paper dolls I made for a her a while back (for post, click here).  She always loved playing with them, but she didn't always think to ask me for a cookie sheet to use them on.  I asked her if it would help to have her own surface to play on and she said yes, so that got my wheels turning.

I had seen metal mini-lunchboxes at Michaels, but I thought I might be able to get a bit more creative at a lesser cost.  So, off to the dollar store.  There, I bought a cardboard lunchbox and a large dry erase magnet.  Each item cost me $2.00, so there wasn't much investment made. (If Hannah ends up using this a lot, I will likely spring for the metal box, just so the magnets hold a bit better.)

First, I traced the edges of the top of the lunchbox onto the front of the dry erase board.  You will actually be using the back of it as your front.  In the photo to the left, you will see my markings.  I shifted the top so you could see where I drew. 

Then, simply cut out your magnet.  You will have to tweak it a bit to fit inside the lid since the measurements you took were from the outside.  Don't forget to dry fit it and make sure that the bottom isn't too close to the hinges.  You want the lunchbox to close properly.  I had to trim a bit off of mine to make it work. 

Next, you will need to adhere your magnet to the box.  The dry erase board came with double sided sticky circles, so I used those.  You can use anything that you'd like.

Finally, find some paper dolls that would work well as magnets.  The ones I had already made Hannah worked perfect.  She can fit three dolls side-by-side and the lunchbox offers plenty of storage for the extra outfits and accessories.  As you can see, she is really enjoying her new "toy".
Some other modifications to this project that would also work, would be:

  • Lining the top with felt and using felt dolls
  • Using a metal lunchbox
  • Making background scenes to go with your dolls.  These could be done on magnets or thin paper and held in place by the dolls
The possibilities are endless.

 
Happy Crafting!!
Sharon

P.S.  I've linked this project up to Creations by Kara's Look What I Made Linky Party!

4.06.2012

Shrinky Dink Magic!

Hey Everyone!

Hannah has had a lot of time off from school lately (Spring Break and now Easter Break), so I have had to get pretty creative when it comes to crafts to keep her busy.  I was poking around on the net the other day and I came across the Disney craft website.  Hannah loves all things Disney, so I figured I would print out a few coloring sheets and be done.  Nope.  I stumbled across a project page for Disney Princess Charm Bracelets, and things took off from there.

As a kid, we had Shrinky Dinks once in a while.  I honestly don't remember what we used them for, so we couldn't have done them too many times.  I had no idea that they still existed, or that you could make your own at home!  So, off to Michael's we went...

We found the Shrinky Dink paper, and I will warn you, it isn't cheap.  For 6 sheets of inkjet paper, it was $22.  I had a coupon that took 40% off, so I wasn't too upset.  Also, if you want to purchase the type that you draw on, rather than print, it was much cheaper and comes in a bunch of different colors.

While at Michael's, we also purchased a pre-made charm bracelet, jump rings and split rings.  I figured I'd need the jump rings to attach the charms and if I wanted to make zipper pulls, the split rings would come in handy.  Thankfully, these both come in large packs, so I can make them last a while.

Once home, we had to decide what characters we would include on the bracelet.  The Disney site has quite a few options (a quick search for charms or cutie charms will lead you to several options), and Hannah had trouble deciding which ones she wanted.  In an attempt to satisfy my little one, and not waste paper, I saved all of the PDFs and then cut and pasted them closer together in Photoshop.  I managed to take 6 sheets and cut them down to 3.  all of the designs she picked printed nicely, just be sure to set your printer for Matte paper and High print quality.  (This is explained in the paper packaging.)

Next was the tricky part, cutting them all out.  I would suggest an adult doing this part, as it involves lots of tricky cuts.  Also, I encourage you to use smaller cuts, rather than trying to cut the shape out in one piece.  I found that the paper tended to tear beyond where I stopped cutting, so trimming off the sides periodically worked much better.  Once your shapes are cut out, you'll need to punch a hole in them for hanging.  My hole punch was touch larger than the circles already pre-printed on the shapes, but it still worked.  We only lost one charm because of the hanging loop falling off (Princess Tiana is now going to be made into a barrette or ring). 

The directions on the paper packaging says to bake the shapes on a cookie sheet lined with a paper bag.  They also suggest parchment or tin foil, and we went the foil route.  It worked great!!  Set your oven between 275-300F and within 3 minutes, you'll have charms!!  Hannah loved watching them shrink up!!


A few jump rings later and voila! a finished bracelet!  We still have lots of charms to use in other projects, so I may be headed back to Michael's for a few more charm bracelets.  I think we'll also make a few into barrettes by hot gluing them on to some clips Hannah already has, and I'm sure a few will become zipper pulls for her backpack.
One step that I don't have photos of, since we didn't have a chance to do it yet, is sealing the charms.  I suppose you don't have to, but I read that it is suggested to use a coat of clear nail polish on the finished charms.  Hannah has some clear with sparkles, so we thought that would look cool on the princesses.  You could also use a spray poly or other sealant to do the trick.
While making these, I was trying to think of other uses for Shrinky Dinks and these are a few I thought of:
  •  Zipper Pull with emergency contact info printed on it for when you are headed to a large public event.
  • A tag with medical information/allergies
  • Party Favors with themed pictures printed on charms or tags
  • Keychain for Mother's or Father's Day
  • Hand drawn Christmas ornaments...what a fun way to capture a child's handwriting!

The list goes on and on!!  The Shrinky Dinks website has a bunch of pattern and ideas too.

All in all, this was a great project and worth every penny!  Hannah loves her bracelet and I love that we can spend time together doing fun projects.

Happy Crafting!
Sharon

2.15.2012

15-Minute Bandanna Dress

Hey Everyone!!

So, I was playing with my sewing machine again today and I whipped up a little dress for Hannah.  I saw this tutorial for a bandanna dress posted on Pinterest and I had to give it a go.  As with Hannah's Busy Bag, I won't do a step by step on here since the tutorial is really detailed.  I just give you a few of my observations and suggestions.

First, when I went to Michaels, I wasn't sure if I needed a regular sized bandanna or the over sized one that they offered.  Hannah is in size 5-6 and a regular sized one was just fine.  A bit big actually.  The bandannas come in a variety of colors and only cost $2.99 a piece!!  I found some ribbon with a touch of bling on it for $1.99.  All in all, a cheap project!


Before I started, I ironed out all of my pieces.  I know I should have washed them first, but they need to be hand washed and I was in a hurry to get going.  Hannah won't be wearing the dress right away (I don't think), so I have plenty of time to wash it later.  One thing I noticed right away was that the bandannas were neither actual squares or the same size.  They were a touch off, but when I pinned them, I just made sure the bottom hem was even on both sides and pinned them appropriately.  I was originally going to square them off when I sewed, but then I realized that you would be able to see the off seam around the arms.  So, I simply pinned the edges evenly and forgot about the misshapen fabric.  Once the dress was on Hannah you couldn't even tell!!

All in all, this was a quick little project that took very little time to make.  Since my sewing machine is downstairs in the Dining Room and my iron is upstairs in my bedroom, I pinned and pressed everything in one step and then came down to sew all of it. 

Hannah loves her new dress!!  I will likely have to cut the ribbon a bit since it seems a bit long to me.  One tip regarding the ribbon...make sure you buy something that is not itchy.  I couldn't imagine using scratchy tulle or sheer ribbon...ouch!!


(Don't mind that she's modeling it over her school clothes!)

Before I go, I also wanted to give you all a preview of the quilt I started.  I am using a Disappearing Nine-Patch pattern, and this is the first Nine-Patch square I've made.  I still need to cut and reassemble it.  My local fabric shop doesn't sell pre-cut Charm Packs, so I had to match my own fabrics and cut them all by hand.  I bought a new straight edge today that should help speed things along, so hopefully this won't take me forever!  I'll post photos as I go along. 

Here's a close-up of the bug fabric that I used as my inspiration fabric. 

Happy Sewing!


Sharon

2.13.2012

Hannah's Busy Bag

Hey Everyone!!

I wanted to share a quick project that I made this weekend for my Diva. She is always asking to bring toys of some sort with her when we go out to dinner, and I never had a small bag to hold everything. Needless to say, my purse had become a bottomless pit of toys and I was bound and determined to put a stop to it.

Cue Pinterest and a tutorial for a cute patchwork bag. It seemed like the perfect size for Hannah's goodies, so I thought I'd give it a try. (We named it the “BusyBag” since it was designed to hold stuff that would keep her “busy” when we go out!)


Since the tutorial is so wonderfully written, I won't comment too much on the actual construction of the bag, just a few things I found out along the way. First,for the squares...I had some jelly roll strips kicking around in the perfect Diva color, so I started there. They were already 2.5-inches wide, so I cut them into a bunch of squares. So simple!!

Next, I had Hannah help me lay the squares out into the pattern that she liked. I did this for a few reasons. One, if she was "part" of the project, she would busy herself long enough to see it finished. Second, it's her bag; it should be how she likes it, right??

I had some coordinating liner fabric (be sure to pick a good fabric...the bag is reversible!!) , so she picked the one she liked best and went off to play Barbies for a bit.

Sewing all of the squares too abit of time since I’m a beginner sewer, but the tutorial walked me through every step, including which direction to press seams, etc. 

All in all, the bag was quite easy to make.  When it came time to turn it right-side out through the hole I left, I decided to machine stitch across the bottom edge, rather than hand stitch it. I knew that Hannah would be stuffing it to the gills so I wanted it to be sturdy.  Also, the drawstring cording has started to fray, so I might be changing that out soon. 

The whole project took less than two hours and has already gotten a lot of use. The best part is that it can be easily sized up or down depending on your needs. 

I see myself making many more of these in the future!!  I bought some fabric with sheep knitting on it the other day, and I can see lots of knitting project bags being made with it!!

Happy Sewing!!
Sharon

P.S. Sorry for the poor quality photos from my phone.  I forgot to bust out my good one while I was making the bag.

2.08.2012

Our Crafting has Gone to the Birds!

Hey Everyone!

Lately it seems like Hannah and I have been seeing more and more wildlife during our week.  Yesterday we saw 2 coyotes walking along the side of a city road (scary since they have to go through our neighborhood to get to the closest safe spot of them), and we've been seeing more and more birds flying overhead.  To celebrate the animals and to try to encourage our feathered friends to come visit our yard, we decided to make new bird feeders.  Our toilet paper tube feeders fed the magpies quite well, and we have been saving up more tubes for spring feeders.  In the meantime, we thought we'd try a different type of feeder. 

This idea originated from a Pinterest post of a project first posted on the HGTV website.  Click here for the link.  Hannah and my husband have been eating a lot of oranges lately, and he is a pro at keeping the peels whole, so I thought it would be perfect for us to try.

To make these feeders you need:

* Orange peels (try to keep them as hole free as possible.  One of ours had a hole from the bellybutton, so I used a snip of coffee filter to plug it)
* Bamboo skewer or chopstick (cut in half)
* Twine or string
* Hole puncher or nail

To make them, you take either your hole punch or nail and make small holes just a touch down from the edge of the orange.  You'll need to make at least two, directly across from each other.  I was a bit off, so I made four holes for better balance. 

Once your holes are made, slide your skewer/chopstick through the holes.  Despite having four holes, we only used one chopstick per feeder.  I wanted a bit of stability, as well as a perch for once the bird food gets lower. 

Then, simply tie the twine to the ends of the skewer, fill the feeder with your food of choice and hang in your favorite tree!!

You can fill these feeders with most anything.  We wanted to give the birds an extra treat, so we mixed up some peanut butter food for them.

To make the filling, you need:

* 1/2 cup peanut butter
* 1 cup of cornmeal or oats (we used a 1/2 cup of each)
* 1/4 cup raisins or any other dried fruit or nuts. 

Simply mix all of your ingredients in a bowl and fill your feeders.  For ours, we used raisins and dried apricots.  I found that the mixture was a bit too dry, so I added a touch more peanut butter to bind it all together.  You can adjust the amounts based on what looks right and what you have in your pantry.

We have two trees in the backyard, so we hung a feeder in each one.  Let's hope we see some customers real soon!!

This project is great for younger children.  They can help measure out the ingredients, mix everything together, fill the feeders and of course, eat the oranges!!

Cheers!
Sharon

12.09.2011

DIY Fun Foam Ornaments

Hello All!

Last night when we were putting up our family Christmas tree, I came across some ornaments that I thought I would share with all of you. 

When Hannah was little, we were concerned that her curiosity would result in some broken ornaments at Christmas.  So, I decided to make some 100% unbreakable ones. 

These are made out of fun foam, and take no time at all to make.  When I made these, sticky backed foam wasn't as available as it is now.  So, I used super glue and hot glue.  Now, you can get most any color or shape with a sticky back, making this project even easier!

First, you need to decide what shapes you will be making.  I used some cookie cutters as inspiration, but several of my ornaments were made free-hand.  I also based several ornaments on their breakable counterparts. 

Once you know what shapes you are doing, simply trace or draw out your shapes on the foam and cut them out.  Keep in mind the possibility that your shapes may end up reversed if you have any markings left from drawing them.  Also, be careful when you cut them out.  I was able to make two candy canes out of one cutting.  I simply made one in the reversed colors of the other.  Some other tools that can be helpful are hole punchers for berries and printable images on the computer. 


Finally, once all of your pieces are cut out, assemble them either with their sticky backs or glue.  When I use hot glue or super glue, I place all of my shapes on parchment paper.  It saves me from making a mess if the glue spills out the sides.
To hang your ornaments, you can use wire, ribbon, pipe cleaners, you name it.  I decided to use wire for mine.  I took a small piece of wire, doubled it over and twisted the ends together.  I then took a small scrap of coordinating foam and hot glued the pieces together, with the wire sandwiched in the middle.  On some of the ornaments, such as the blue ball with snow, I sandwiched the wire between the white and blue foam. Be sure if you do this that none of the wire is peeking out from under the foam.  It wouldn't take much to scratch a little one, which defeats the purpose of making kid friendly ornaments!! 

The possibilities are endless with this craft!  You could even pre-cut the pieces and have an ornament party with your kids and their friends.  These make great keepsakes, and you could even add a photo to a wreath shaped ornament for a great gift for family members.  I'd love to hear your ideas!!

Happy Crafting!!
Sharon

12.07.2011

DIY Recycled Bird Feeders

Hello All-

I was going through some photos left on my camera and I came across a project that I had been wanting to post and forgot.  About a month or so ago (before the snow), Hannah and I decided to do something nice for both the birds and the environment.  We made toilet paper tube bird feeders!!  This was a mildly messy project, but easy to clean and lots of fun!  Even though many of you may have snow, this can easily be adapted to being an indoor project...just be sure to cover the surface you're working on well to avoid a big mess.

First, we collected a few toilet paper tubes from our craft bag.  I had been saving them for a bit with no project in mind, so this was a perfect use for them!!

Next, you'll want to gather all of your supplies.  I suggest getting everything out first, since things can get a bit messy once the peanut butter comes out! 

For this project you'll need:
- Toilet paper tubes
- Bowl for peanut butter
- A child safe knife (or an adult can do the spreading)
- Birdseed
- A tray to catch extra birdseed

Once everything is ready, you'll want to put a fair amount of peanut butter in your bowl.  It doesn't take much to cover the tube, but little ones may have some trouble spreading it because of the stickiness, so you'll want to give them some extra. 

Then, spread the peanut butter all over the tube.  I found it best to put my fingers inside the tube to hold it and keep it's shape better while spreading.  The oils from the peanut butter tend to make the cardboard a touch soggy and it will crush much easier.  you might even want to hold the tube for your child while they cover it with peanut butter.

Next, roll the tube in birdseed.  I found that putting a bunch of seed into an old pie plate worked well.  It also made clean-up easier.

Once your tube is fully covered, find a tree branch to slide your tube over.  Be sure that you can easily see the branch from a window in your home, since snow may prevent you from getting outside to view.

Finally, admire your work and wait for a few new friends to stop by! 

The best thing about this project is that we had all of the materials in the house already, so it cost nothing.  It is also easy enough to make year round, so your feathered friends won't go hungry!!

Have fun making your toilet paper bird feeders!!

Happy Crafting!
Sharon

12.05.2011

DIY Christmas trees

Hello All-

I wanted to share a Christmas project with all of you that got a bit of attention on my Facebook page last week.  With a new house and new spaces to decorate, I have been spending a fair amount of time at various stores scouring through their decorations for "the perfect ones."  I noticed that one type of decoration that kept popping up in my search was small decorated Christmas trees.  Not decorated with ornaments and lights, but instead, feathers, paper sheet music, beads, you name it.  A quick search on Pinterest and you'll see countless variations.

I decided to give this new trend the old "DIY try".  So far I have made two trees for our mantle, and if time allows, I will add a third to the set. 

(I apologize that I don't have step-by-step photos, but they are quite easy to make. I didn't expect to be blogging about them until numerous people started sending me messages with questions about them)

The first one I made was the button tree.  I have quite a large button collection, but I wanted some variety and I picked up a few bags of mixed buttons at Michaels.  I will warn you, these can get costly, so this would be the perfect time to get your hands on one of their 50% off coupons!!  Not only do you need lots of buttons, but you'll also want to pick up a Styrofoam tree and lots of push pins.  I decided to go with red and green tipped pins for a bit more color, but any large headed pin will do.  I suppose you could also glue your buttons, but I wanted the ability to change mine around and potentially use some of them in knitting projects. 

You'll want to start pinning your larger, more basic buttons, around the tree.  I found that on the larger ones, using two pins was more helpful in keeping them still.  From there, you keep building up the layers and adding more of the smaller and more unique buttons.  Keep going until you feel that enough of the tree has been covered (you don't want a lot of holes and Styrofoam peeking through).  For buttons with shanks and not holes, simply bend your pin into an "L" shape and poke it through that way.  Also, when you get toward the top, be careful!  My pins started poking through the point of the tree and I had to take a break to let the bleeding stop!!

The next tree I made was a ribbon tree.  To make this one, you again need a Styrofoam tree, and pins, though flat headed ones work best on this project.  You will also need ribbon.  I went with four different patterns and one roll of each.  Depending on how full or colorful you want your tree, you may have to adjust how much ribbon you use.  I used every last scrap I had, and I probably could have used another roll for good measure. 

To make the tree, you simply cut your ribbon into 3-inch lengths.  From there, you fold the ribbon pieces in half and secure them to the tree using pins.  Once you finish your row, you start the next one, slightly overlapping the ribbons to cover the pins from the row below.  Keep going in whatever color pattern you choose, again being careful not to poke yourself as you near the top of the tree.

See, pretty simple!!  I have one more tree that is taller than the other two, and I think I will be covering it in yarn.  A friend suggested pompoms, and if I can get them to stick, that may be an option too.  Hmmm...so many ideas!!

Well, I'm off to ready the little one for school.  Tonight we are decorating our tree, so stay tuned for some photos of that!!

Cheers!
Sharon

12.01.2011

Salt Dough Ornaments

Hello Everyone!!

I have been getting some questions lately from friends looking for ornament ideas that would be good for their little ones to make.  I did this post last year for "Kids in Cowtown" and I thought I would re-run it here.

Enjoy!!

I recently received my December issue of Canadian Living in the mail, and I couldn’t wait to try out one of the craft ideas, Salt Dough Snowflakes. I used salt dough for school projects as a child, so I was excited to use it again after all these years.
This project is great for doing with little ones. I had my 3 ½ year old help with every step, and she did a great job! I must also say that I had originally thought I was in for a big mess, but it wasn’t bad after all.


First, you need the following ingredients (Tip: I cut the ingredients in half for my first try and it worked fine):
2 cups all-purpose flour
1 cup salt
1 cup warm water
Mix the flour and salt together in a bowl with a wooden spoon. Add the water a bit at a time until your mix starts to look like cookie dough. Turn out onto your work surface, knead it a few times and roll it out to approx ¼ inch thickness.


After that, use cookie cutters to make your shapes, and place them on a parchment lined cookie sheet. Before you put them in the oven, poke a hole in the top of each one with a drinking straw (this hole is for a hanging ribbon). Bake at 300-degrees for 1 to 1 ½ hours. Once they cool completely, you can paint and decorate them any way you like!


Here are some tips I figured out along the way:
* You don’t have to use just snowflake cookie cutters…we used some that I already had in the house, and my daughter came up with the idea to use her Play Doh cutters. They worked great and made for some really fun shapes!


* I don’t have a lot of “kid-friendly” paints in my home, so we used washable markers. I found that they created less mess and Hannah was able to use more colors on each ornament. We also used glitter pens from one of her coloring sets to add some sparkle to each ornament.


* We split this project into two days…one to make and bake the ornaments and another to color them. I found that not only did it give me two days of crafty fun, but my daughter’s attention span wasn’t stretched too far this way.

We had so much fun making these! While creating them, I thought of a few other uses for the ornaments…wouldn’t they make great place cards at a holiday meal? Guests could keep them as favours and remember a wonderful time at your home. (Be sure to add the year on the back of them with a permanent marker) Also, I can picture these as cool gift tags. With cookie cutters coming in so many different shapes, you could really personalize them to the gift recipient. Finally, do you have a lot of children that visit your home during the holidays? You could make the ornaments ahead of time, then make goodie bags with an ornament, a few markers, a glitter pen, and a piece of ribbon. Place everything into a clear bag with a gift tag, and you have a quick, easy gift that costs only a few dollars. The possibilities are endless!!!

Have fun making your salty new works of art, and I would love to hear other uses that you can think of!

Cheers!
Sharon